|
| |
| HOW TO MAKE
A MAGNUM FLASHABOU IN-LINE MUSKY SPINNER (Part 3 of
6) |
Page 1,
2, 3,
4, 5,
6 |
Tying the
Primary Skirt:
| First you need a vice extension to hold your coil
spring in your tying vice. An allen key makes a great vice extension or you can
also make you own using a three inch scrap piece of 0.062" wire shaft and
forming a 90-degree bend on one end using your needle nose pliers (figure 1). |
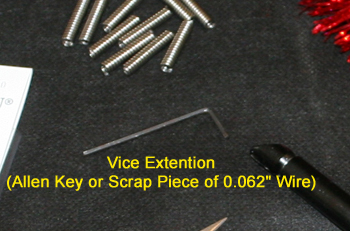
figure 1
|
| Lock your vice extension in the
jaws of your tying vice. Now thread the
coil onto the extension and lock it firmly in the vice so that the coil spring
can not move on you.
Using your thread and bobbin lay a
solid base of thread on your coil spring by wrapping thread back and forth
several times until the coil is covered with tread. Generously coat your
threaded coil with head cement and allow to dry for a few moments (figure 2).
|
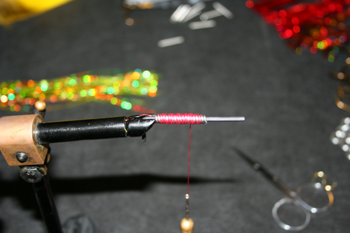
figure 2
|
| While the head cement is drying
on your coil spring you can open your package of 20" long Magnum Flashabou. You will
tie two flashabou skirts, one larger primary skirt and a
smaller secondary skirt so you will have to divide the package of flashabou
before tying.
First cut your 20" hank in half, next combine all the material into a one large
pile. The flashabou should now be approximately 10 inches long. Now divide the pile into two new piles with approximately 2/3rds going to
one pile and 1/3rd going to the second pile (Figure 3).
|

figure 3
|
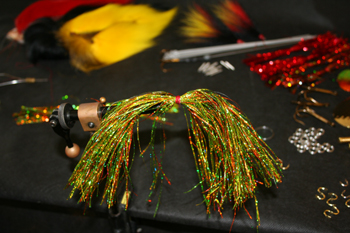
| Test the head cement on your
coil by touching it. If it is wet or sticky to touch you should let it dry
longer.
Using the larger pile evenly distribute the
flashabou around the coil, tying them at their mid point. Use head
cement often. Half hitch and cement again. Allow cement to dry.
Your primary skirt is now complete (figure
4). |
 |
|
|
|
|